2019-12-26 19:30:18 +00:00
---
layout: post
title: DVID - Damn Vulnerable IoT Device
---
## DVID - Damn Vulnerable IoT Device
2019-12-26 19:36:18 +00:00
Who ever wanted to learn about Hardware Hacking ? I found this small opensource **IoT hacking** learning board while I was in a security event. It is designed by [@vulcainreo ](https://twitter.com/vulcainreo/ ) and cost around 45€, more than 300 units were shipped around the world.
2019-12-26 19:30:18 +00:00
2019-12-27 10:34:12 +00:00
<!-- more -->
2019-12-26 19:30:18 +00:00
Let's dig into this awesome project and clone the git : `https://github.com/Vulcainreo/DVID.git` !
## Challenges' Writeup
2019-12-26 19:42:51 +00:00
* [Hardware - findTheDatasheet ](#hardware---findthedatasheet )
* [Firmware - Default Password ](#firmware---default-password )
* [Firmware - Hardcoded Password ](#firmware---hardcoded-password )
* [Bluetooth - Advertising ](#bluetooth---advertising )
2019-12-26 19:30:18 +00:00
### Hardware - findTheDatasheet
> A password is displayed on the pin PD1
First we need to push the correct firmware to start playing with the device, the LED will blink.
2019-12-26 19:36:18 +00:00
{% highlight python%}
2019-12-26 19:30:18 +00:00
$ sudo avrdude -c usbasp -p m328p -U flash:w:findTheDatasheet.ino.arduino_standard.hex
avrdude: warning: cannot set sck period. please check for usbasp firmware update.
avrdude: AVR device initialized and ready to accept instructions
Reading | ################################################## | 100% 0.00s
avrdude: Device signature = 0x1e950f (probably m328p)
avrdude: NOTE: "flash" memory has been specified, an erase cycle will be performed
To disable this feature, specify the -D option.
avrdude: erasing chip
avrdude: warning: cannot set sck period. please check for usbasp firmware update.
avrdude: reading input file "findTheDatasheet.ino.arduino_standard.hex"
avrdude: input file findTheDatasheet.ino.arduino_standard.hex auto detected as Intel Hex
avrdude: writing flash (14346 bytes):
Writing | ######################## | 48% 7.14s
2019-12-26 19:36:18 +00:00
{% endhighlight %}
2019-12-26 19:30:18 +00:00
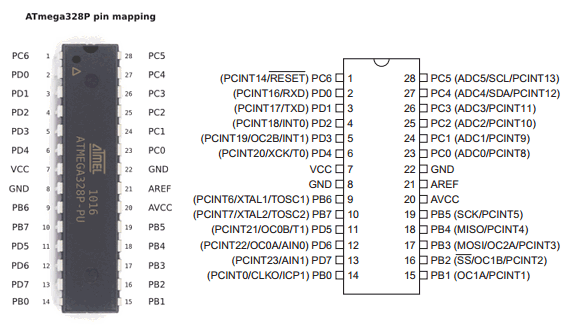
We are asked to connect RX to the PD1 pin to get the password, we need to check the Datasheet to know where is the PD1 pin.
2019-12-26 19:36:18 +00:00
{: .center-image }
2019-12-26 19:30:18 +00:00
The board is using an ATmega328, let's check the pinout from Wikipedia : https://en.wikipedia.org/wiki/ATmega328, we see PD1 is linked to UART TXD pin.
Using the Gerber file **Gerber_BottomLayer.GBL** provided in the github we can also see the PD1 pin is linked to Soft Flash TX, I used http://www.gerber-viewer.com to display the file.
2019-12-26 19:36:18 +00:00
{: .center-image }
2019-12-26 19:30:18 +00:00
A simple wiring to the UART port is enough to connect the DVID to my Kali Linux VM, we can then access i
t through ** /dev/ttyUSB0**. We can check our VM logs using **dmesg** command.
2019-12-26 19:36:18 +00:00
{% highlight bash%}
2019-12-26 19:30:18 +00:00
$ sudo dmesg -w
[10691.448743] usb 3-3.1: new full-speed USB device number 8 using xhci_hcd
[10691.770954] usb 3-3.1: New USB device found, idVendor=10c4, idProduct=ea60, bcdDevice= 1.00
[10691.770956] usb 3-3.1: New USB device strings: Mfr=1, Product=2, SerialNumber=3
[10691.770957] usb 3-3.1: Product: CP2102 USB to UART Bridge Controller
[10691.770959] usb 3-3.1: Manufacturer: Silicon Labs
[10691.770960] usb 3-3.1: SerialNumber: 0001
[10691.827000] usbcore: registered new interface driver usbserial_generic
[10691.827757] usbserial: USB Serial support registered for generic
[10691.835531] usbcore: registered new interface driver cp210x
[10691.835539] usbserial: USB Serial support registered for cp210x
[10691.835560] cp210x 3-3.1:1.0: cp210x converter detected
[10691.839533] usb 3-3.1: cp210x converter now attached to ttyUSB0
2019-12-26 19:36:18 +00:00
{% endhighlight %}
2019-12-26 19:30:18 +00:00
From there we only need to read the output with Python or with `minicom -b 9600 -o -D /dev/ttyUSB0` (use Ctrl A + X to exit).
2019-12-26 19:36:18 +00:00
{% highlight python%}
2019-12-26 19:30:18 +00:00
$ python2
Python 2.7.17 (default, Oct 19 2019, 23:36:22)
[GCC 9.2.1 20191008] on linux2
Type "help", "copyright", "credits" or "license" for more information.
>>> import serial
>>> port = '/dev/ttyUSB0'
>>> baud = 9600
>>> ser = serial.Serial(port,baud)
>>> read = ser.readline().decode('utf-8')
>>> print(read)
D***[...]******
2019-12-26 19:36:18 +00:00
{% endhighlight %}
2019-12-26 19:30:18 +00:00
2019-12-26 19:36:18 +00:00
{: .center-image }
2019-12-26 19:30:18 +00:00
### Firmware - Default Password
> A confidential message is stored on the firmware but protected by a default password.
Once again we push the firmware : `sudo avrdude -c usbasp -p m328p -U flash:w:defaultPassword.ino.arduino_standard.hex` .
Since the challenge is to find a default password, we will connect to the debug interface (UART) of the DVID and try to interact with it. First we need to wire it correctly, remember to pair RX with TX and TX with RX, and do NOT plug the USB if you wire the 5v pin ;)
2019-12-26 19:36:18 +00:00
{% highlight bash%}
2019-12-26 19:30:18 +00:00
VCC < --- > VCC
RX < --- > TX
TX < --- > RX
GND < --- > GND
2019-12-26 19:36:18 +00:00
{% endhighlight %}
2019-12-26 19:30:18 +00:00
Using the code from the last challenge we can write a simple script to interact with the device /dev/ttyUSB0. We will iterate over the john wordlist to bruteforce the service until it responds with "ok" instead of "ko".
2019-12-26 19:36:18 +00:00
{% highlight python%}
2019-12-26 19:30:18 +00:00
import serial, time
port = "/dev/ttyUSB0"
baud = 9600
s = serial.Serial(port)
s.baudrate = baud
with open('/usr/share/john/password.lst', 'r') as f:
lines = f.readlines()
for pwd in lines:
if not "#" in pwd:
res = s.write(pwd.strip())
print("Pwd: {}".format(pwd.strip()))
print("Sent {} bytes".format(res))
print("Result: {}".format(s.readline()))
time.sleep(3)
2019-12-26 19:36:18 +00:00
{% endhighlight %}
2019-12-26 19:30:18 +00:00
And we got it ! Obviously the password is hidden, real one is available [here ](https://www.youtube.com/watch?v=SCaAetNzXIc ) :D
2019-12-26 19:36:18 +00:00
{: .center-image }
2019-12-26 19:30:18 +00:00
### Firmware - Hardcoded Password
> A confidential message is stored on the firmware but protected by a password.
We push the firmware with `sudo avrdude -c usbasp -p m328p -U flash:w:hardcodedPassword.ino.arduino_standard.hex` .
Now we will dump the previously sent firmware, we could just analyse the **hardcodedPassword.ino.arduino_standard.hex** file but it is not realistic.
2019-12-26 19:36:18 +00:00
{% highlight python%}
2019-12-26 19:30:18 +00:00
$ sudo avrdude -c usbasp -p m328p -F -U flash:r:dump.hex:i
avrdude: warning: cannot set sck period. please check for usbasp firmware update.
avrdude: AVR device initialized and ready to accept instructions
Reading | ################################################## | 100% 0.00s
avrdude: Device signature = 0x1e950f (probably m328p)
avrdude: reading flash memory:
Reading | ################################################## | 100% 17.15s
avrdude: writing output file "dump.hex"
avrdude: safemode: Fuses OK (E:FF, H:D9, L:E2)
avrdude done. Thank you.
2019-12-26 19:36:18 +00:00
{% endhighlight %}
2019-12-26 19:30:18 +00:00
Now we have a file **dump.hex** containing the current firmware, let's convert it to binary with `avr-objcopy -I ihex -O elf32-avr dump.hex dump.elf` .
we could also dump the firmware as raw binary with `sudo avrdude -c usbasp -p m328p -F -U flash:r:dump.raw:r` .
From these dumps we can make a wordlist of every strings in there, then we will try to bruteforce the service by sending everyone of them.
2019-12-26 19:36:18 +00:00
{% highlight bash%}
2019-12-26 19:30:18 +00:00
$ strings dump.elf -n 10 | tee passwords.lst
>[O[>>kOk>
rIIIF!AIM3
'EEE9< JII1A !
(DD88DDD(8DD(
:@@ z8TTUY!UUyA"TTxB!UTx@ TUy@
9UUUY9TTTY9UTTX
I2III2:DDD:2JHH0:AA!z:B@ x
}=BBB==@@@=< $
D}A0HHJ28@@"z
1}& ))/(& )))& 0HM@ 8
rL0JMM00HxH0
~*****DD_DD@QJD@@DJQ@
d'u'F'W'd'u'
sup3rp4ssw0rd
T5uzzrhz4tf23lsccbes1111
T03 Hard.Pass.
I have confidential message. Pass ?
Wrong password
Well done! Message :
2019-12-26 19:36:18 +00:00
{% endhighlight %}
2019-12-26 19:30:18 +00:00
We can reuse the last challenge script, this time we have to remove the `s.readline()` line since we are blindly attacking the service. Nothing will be outputted on the serial port in case of a good password, we need to pay attention to the screen, fortunately the password is in our small list of 15 passwords.
2019-12-26 19:36:18 +00:00
{% highlight python%}
2019-12-26 19:30:18 +00:00
import serial, time
port = "/dev/ttyUSB0"
baud = 9600
s = serial.Serial(port)
s.baudrate = baud
with open('passwords.lst', 'r') as f:
lines = f.readlines()
for pwd in lines:
a = s.write(pwd.strip())
print("Pwd: {}".format(pwd.strip()))
print("Sent {} bytes".format(a))
time.sleep(10)
2019-12-26 19:36:18 +00:00
{% endhighlight %}
2019-12-26 19:30:18 +00:00
The `time.sleep(10)` is very important, we don't want to flood the board with too many passwords !
2019-12-26 19:38:38 +00:00
{: .center-image }
2019-12-26 19:30:18 +00:00
### Bluetooth - Advertising
> A confidential message is stored on the firmware but protected by a password
* The goal is to provide a screenshot of the confidential message
* Tips: Hey ! Advertise me to know my name
I had to setup my virtual machine correctly to use the Bluetooth dongle provided with the DVID, the following commands were enough to get it running. However I later discovered the BLE was not working as it should be...
{% highlight bash%}
$ systemctl enable bluetooth
$ sudo systemctl restart bluetooth
$ bluetoothctl
[bluetooth]# select 18:1D:EA:9E:XX:XX
Controller 18:1D:EA:9E:XX:XX vmkali [default]
[bluetooth]# power on
Changing power on succeeded
[bluetooth]# scan on
Discovery started
[CHG] Controller 18:1D:EA:9E:XX:XX Discovering: yes
[CHG] Device 38:18:4C:YY:YY:YY LegacyPairing: no
[CHG] Device 38:18:4C:YY:YY:YY RSSI: 127
[CHG] Device 38:18:4C:YY:YY:YY Name: WH-1000XM3
Here the DVID should have appeared ...
{% endhighlight %}
NOTE: from there I switched to my Phone and the application [NRF Connect ](https://play.google.com/store/apps/details?id=no.nordicsemi.android.mcp&hl=en_US ). In order to get the flag we have to send the bluetooth name through the serial port.
2019-12-26 19:36:18 +00:00
{: .center-image }
2019-12-26 19:30:18 +00:00
2019-12-26 19:36:18 +00:00
{% highlight python%}
2019-12-26 19:30:18 +00:00
import serial, time
port = "/dev/ttyUSB0"
baud = 9600
s = serial.Serial(port)
s.baudrate = baud
pwd = "dvid-redacted"
res = s.write(pwd.strip())
print("Pwd: {}".format(pwd.strip()))
time.sleep(3)
2019-12-26 19:36:18 +00:00
{% endhighlight %}
2019-12-26 19:30:18 +00:00
2019-12-26 19:36:18 +00:00
{: .center-image }